Published On Jul 2, 2018
For this restoration video ive decided its about time to start refreshing the engine bay on my 1992 MAZDA MX-5 EUNOS ROADSTER ( MIATA) and where better to start than the rocker cover.
As you can probably tell the car has been sitting for a loooong time and everything is going rusty and crusty. so first thing is first i whipped the strut brace off to give clearance for the rocker cover to come out. once the plug leads, coil packs and oil breathers are disconnected its time to undo the cover bolts and remove the rocker cover.
Once off i could see the engine has been fairly well cared for judging from the condition of the valve train and lack of baked on oily gunk on the inside of the rocker cover.
The next job was the remove the oil vapour plates to allow access to give the cover a thorough degreasing. The inside was covered with gunk and allowed to soak for a while before scrubbing with a wire brush and scotchbrite for the hard to reach areas and it came up very well indeed with only minimal oil staining but im not to worried about that as its going back on the engine and not being a show piece.
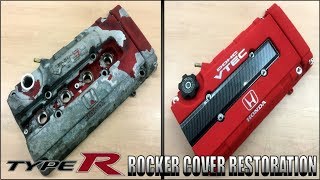
When the underside was completely clean i moved on the topside, it was heavily corroded with lots of pitting and high spots. I used my draper multi tool with wire brush attachments to get into all the tight spots where lots of corrosion was lurking then i moved onto an aggressive sanding of the flat areas with some 80 grit sanding pads which cleaned up and flattened out the surface nicely.
Then it was a case of masking up and starting the priming process. The first layer is always etch primer as normal primers lack the acid content to etch into the metal and get an effective grip on the surface. After the etch i came back with 3 layers of high solid high build primer to give me enough material thickness to work with to flatten back to get a smooth surface. After the primer had cured it was all wet flatted back with several grades of wet and dry and finely finished with some grey scotch brite to even out the surface to allow the metallic to lay down evenly.
Back into the booth for the first of several layers of colour, the colour i chose for this project was BMW VERMILLION red as its a very deep and rich colour with a very high but very fine metallic gold content which makes the colour pop in bright light. After the base coat and adequate curing time i sanded back the lettering with several grades of sand paper and a mirka flat block until i got the desired brushed effect on the lettering, you need to have a very steady hand and a bit of courage for this step (yes i could have masked up the surrounding area to protect the paint but wheres the fun in that ;))
After lacquering and curing all that was left was to rtv silicone and stud lock the vapour plates back on and rebuild the top side.
Very satisfying restoration.
If you would like to see more of the engine bay restored please leave a comment and let me know what you think, all ideas and advice on how to grow the channel are welcomed.
and as usual dont forget to like, share and subscribe.
Really Random Channel
PRODUCTS USED.
several hand tools-snap-on,sealey,silverline,draper.
chemicals-GUNK engine degreaser, Concept chemicals Master cleaner, U-pol standard thinners,panel wipe and paint systems.
pressure washer- Karcher K2
Assorted sanding and grinding products.