Published On Mar 31, 2022
Hi Everyone! In this video I'll show you how it is possible, in a way, to use 3D printed moulds to make prepreg carbon fiber parts. The results are a bit mixed but I see a lot of potential and opportunities.
If you've missed previous video, make sure to check it out as well to get a better understanding on how the 3D printed moulds were made and how the first parts were made. These are the ones that are being used in the second part of the video where I do a polished finish and a glossy finish.
3D Printed Moulds To Make Carbon Fiber Epoxy Resin Tubes – How to Tutorial: • 3D Printed Moulds To Make Carbon Fibe...
For this tutorial:
In the previous tutorial moulds were made printing PowerPLA from additive heroes, following link: https://www.3dprinthings.be/materiale...
These filaments are still PLA but lean a bit more to ABS features.
The moulds were then filled with the @easycompositestv TC80 Tool Cast Epoxy Casting Resin. Moulds were only cured, up to 60°C as I knew they were only going to be used for coldcuring resins at this stage.
As I had the idea to use these moulds for prepreg as well, a higher mould temperature is needed. Thats why I decided to put these PLA moulds to the test and possibly ruining them, but if you don't try, you don't learn so went for an extra postcuring cycle to raise the Tg value even more. To reach higher Tg values you need to gradually raise the temperature of the material in a controlled way. I went for following cycle:
2h 60°C - 1h 70°C - 1h 80°C - 1h 90°C - 2h 100°C - 1h 110°C - 2h 120°C
That way we should be able to cure at those higher temperatures to cure prepreg carbon fiber as well now. On of the possible risks is fully deterioration of resin and PLA causing it to be brittle and lose part geometry due to shrink or expansion.
After removal from the oven, no big changes were noticable, only doing a further inspection I've noticed the sharp edges had some movements as well as the flat sides were bend inwards, probably shrinkage where there was a different mass.
for the prepreg side of things I've went quite rapidly through the process as I've already covered the entire process in another video.
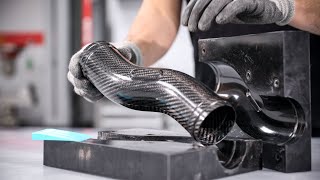
Carbon Fiber prepreg is applied, In this video I've used 3 layers of Easy composites XC110 210g 2x2 Twill 3k Prepreg Carbon Fibre (1250mm).
The prepreg used here was a bit outdated on shelf live but thought it would still serve it's purpose for such small test.
After the layers are applied the lay up of stacked prepreg carbon fiber is debulked (remove air inbetween the layers) using a perforated film with breather, then put into a bag and vacuum is pulled.
Before bagging everything up in the final vacuum bag a film of release film is applied, then everything is put into the bag and sealed using tacky tape. the press fit vacuum connector is then used to pull full vacuum, then everything is put into the curing oven, under vacuum, for over 8 hours.
The part wasn't perfect. The part had some bridging and pinholes. Is this caused due to outdated prepreg, something to do with the PLA chemistry, wrong curing cycle or user error? Analyzing the part and where the flaws are I would think user error. I didn't put that much time into well placing the prepreg in the mould thinking it was an easy mould, as well I've forgot to bolt the holes, where some resin might have leaked into. This could cause the part to be not as resin rich as it would need to be, causing pinholes.
I know from experience that some materials like polyurethane and polyesters tend to "sweat" residue under high temperatures which might cause some problems as well. So it can be a combination of many factors. Anyhow, I'm still pleased with the results, the moulds held well and can be used for more parts, and more testing needs to be done!
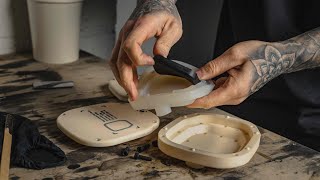
As for the finishing of carbon fiber parts I had two samples from previous tutorial. One was good, the other one had some flaws. I decided to show you 2 possible different finishes, One glossy, the other one highly polished carbonfiber. You'll mostly find highly polished carbon fiber on super cars and F1 cars. As they still want to have smooth surfaces for good airflow, but don't want to add extra weight of clear.
To fix the flaws, like big pinholes and air pockets its good practice so sand the part with 120P grit sanding paper, then coat a layer of resin on top, to fill the big flaws, then go back to sanding with a 240P grit. I've used 1K clear out of spraycan to keep everything as DIY and simple in the video. Obviously a 2K out of spraygun gives better results! but that will be for another video ;)
Gloss part: 120P, epoxy coat, 240P, Clear 2x, 320P, Clear, 1000P, 2000P, soft polish
Polished part: 240P, 320P, 500P, 1000P, 2000P, Hard polish, soft polish
Facebook: / mat2composites
Instagram: matthieulibeert
twitter: @matthieutje65
web/mail: https://www.mat2composites.com
#3DPrint #Carbonfiber #Mould