Published On Nov 10, 2022
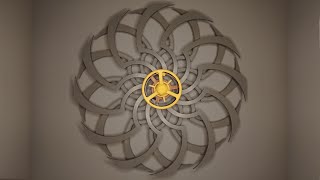
This is the escapement powered by Bob, the humble escapement operator. Bob is the one responsible for adding a pulse to keep the pendulum swinging, as well as triggers the advancement of the escapement wheel. This is my take on this escapement designed by dgreene909
The STL File: https://jbvcreative.com/products/the-...
Prints on all standard 3d printers without supports, requires the following additional parts to assemble:
- 8 M4x12 Screw (I used https://amzn.to/3Cf7dpp)
- 6 M4 Washers (These are the ones https://amzn.to/3Sh129Z)
- 4 624Z 13mm OD/4mm ID Bearings (These work great https://amzn.to/3rdtj58)
- 1mm Nylon String or Fishing Line (I used string from this set https://amzn.to/3dOHT00)
Recommended print settings:
Layer Height: 0.2mm
Nozzle: 0.4mm
Infill: 15-18%
Total Print Time: ~15.75 hours
Total Filament Required: ~145g
Minimum Build Plate Required: 200x200mm
Please note that these files are for personal enjoyment only. If you do wish to sell PRINTED versions of this model, you can do so with a JBV Creative Small Business License / jbvcreative
**All the files have been pre-oriented to save you some set up time! All you need to do is drop the parts into your slicer and hit print!
The Kit:
Let me do the printing for you! You will receive all the parts required to assemble this kinetic sculpture yourself.
Discord Channel:
I Created a discord channel to talk about all things Escapement and 3D Printed clock. You can join with / discord