Published On Jun 3, 2016
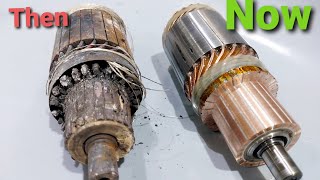
Video tutorial on how to rebuild a starter yourself at home. This is a great way to save money considering it’s only about $10 for replacement parts and a rebuilt replacement can around $150 depending on the vehicle. The repair maybe slightly more if you have to replace a solenoid.
Website: http://4diyers.com
Facebook: / 4diyers
Google Plus: https://plus.google.com/+4DIYers
Twitter: / 4diyers
Instagram: / 4diyers
Tumblr: / 4diyers
Pintrest: / 4diyers
Tools/Supplies Needed:
-new brushes, bushings or bearings, and solenoid
-multimeter
-600 grit aluminum oxide sandpaper
-ratchet and socket set
-paint
-grease
-electrical contact cleaner
-wire brush
-scraper
-clean rags
-degreaser
-pliers
-adjustable wrench
-tape
-paint marker
Procedure:
-remove starter from vehicle
-tape up any exposed holes on the starter
-clean the outside using a scraper and wire brush
-use a paint marker to mark any case seams
-remove the main power cable coming off the solenoid
-remove the outer bolts on the starter case
-these are extremely long and small, so take your time as you can risk breaking them depending on the condition of your starter
-the starter should pop right apart
-do not force the starter apart as there are plastic components which can break
-remove the solenoid
-the plunger will fit into a plastic fork so it does need to be shifted to one side so it can be removed from the unit
-remove rubber cap holding the engagement lever into place, then remove the final drive assembly
-the gear reduction just slides apart and inside you will find a series of gears
-remove the two bolts on the backside and pull off the cap
-remove the small rubber cap on the side that both holds and insulates the cable which just slides out
-pull back on the shaft to help assist the armature and brushes out
-pop the metal clips back and remove the cap on the brush carrier
-fully remove the metal clips and pull the brushes out, be extremely careful not to lose the springs in the process
-using a plastic safe degreasing, clean up any old lubricant on any parts with a clean rag
-disassemble the final drive, there is a c clip at the end of the shaft that holds the pinion gear in place
-remove the pinion gear and clutch assembly, inspect for any damage and replace if necessary
-remove another c clip, this time using needle nose plies to separate the final drive shaft
-clean up everything again with a degreaser
-there will be a bushing inside the case, so inspect that for any damage and replace if necessary
-for reassembly, apply a film of grease to any moving parts
-use a high quality grease throughout the starter motor, something which will maintaining good lubricating qualities in cold climate and not melt under high heat
-the grease will provide lubrication and hold the ball into place, make sure you do not lose it
-there will be a bushing in the end cap housing, therefore make sure it is in good condition with not play, replace if necessary
-I used a hacksaw blade to cut a slit in the bushing, do not cut all the way through as we do not want to mark the casing
-using a chisel, crush the bushing and then you’ll be able to remove it
-clean up any old dirt or lubricant
-gently insert the new bushing with a hammer, once it becomes a little lower, use the old bushing to help assist it into place and ensure it sits into the same location as before
-clean up the armature using electrical contact clean and a tooth brush
-commutator resurface using 600 grit aluminum oxide sandpaper and a drill
-clean up the commutator using electrical contact cleaner and ensure the spaces between the commutator bars are clean
-the mica in these spaces should also be about 1mm lower
-using a multimeter, test the armature
-wash the inside of the start case with contact cleaner to remove any contaminants
-checked the solenoid with a multimeter
-for reassembly, install the final drive back into the case
-apply a light amount of oil to the oilite bushings if desired
-install rubber cap, solenoid and then motor case
-install the new bushes in the carrier and seat using 600 grit aluminum oxide sandpaper so they match the contour of the commutator
-wash everything with electrical contact cleaner
-assembly the starter
Thank you to all those who watch my videos and support my content. Don't forget to subscribe to my channel for future tutorial videos and like my video if you found it helpful. New videos are always being uploaded every week!
© 4DIYers 2013
All Rights Reserved
No part of this video or any of its contents may be reproduced, copied, modified or adapted, without the prior written consent of the author.