Published On Jun 15, 2022
Click for more info and reviews of this BAK Industries Tonneau Covers:
https://www.etrailer.com/Tonneau-Cove...
https://www.etrailer.com
Don’t forget to subscribe!
/ etrailertv
Full transcript: https://www.etrailer.com/tv-install-b...
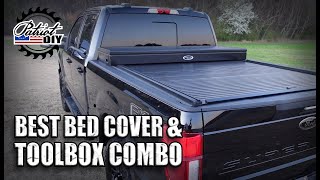
What's up everybody It's AJ with etrailer.com. Today, we're gonna be checking out the Backflip F1 hard tonneau cover on our 2022 Ford F250 super duty. That's gonna be a hard tonneau cover. So it's not one of those soft ones. It's got the fiberglass here with the core and then the aluminum rails on the outside. You've even got weather ships all around it.
You can see it's gonna hold up just fine. It can hold up to 400 pounds evenly distributed. So I wouldn't go testing that too much, but if you are gonna set a cooler or something on here when you go to open the back tailgate, you can do that and it's fine. Now, I like that these have the quad fold up design just because you can go panel by panel opening it up and then it gives you full bed access if you need. It's not one of the ones that retract into a canister down here that takes up some of your bed.
This doesn't eat up your bed at all. So I really like that. And this is gonna also last a little bit longer than the soft tonneau covers, because sometimes those can just have a few poles in between there. So when it rains or snows, it's gonna hold down on that and like, make that go down over time. This is gonna hold up a lot longer to the elements.
So how the tonneau cover works is I'll lower the tailgate and show ya. We got the pull handle here, that's gonna be for each section. So you pull that. You can fold it up like I was talking about onto itself right here. It won't lift up anymore.
So you can reach in, pull that, get this section to come up as well. And when we get to the cab, there's one more. And look, you got the bumpers here too so that when I pulled this and fold it up on the glass, it's not gonna damage anything. Now, a nice thing about this is if you wanna keep it up there to have that pulled that full bed access like I've been talking about, you can slide that bracket down, tighten that knob and you can drive around with it like this, up and outta the way. Just make sure you put these up on both sides. Another way you can travel with it, is is with it folded down down like this, just make sure you make those clips go in just for extra safety and make sure it doesn't go anywhere. Installation isn't that bad. You don't have to drill any holes. I did have to drill holes through the caps at the bottom of the bed just for the drainage tube, that wasn't so bad though. Otherwise it's three clamps holding up each rail on each side. It's pretty easy. Check out how we did it. First thing we want to do is get some rubbing alcohol and clean off our bulk head up here. Cause we're gonna put a weather strip on because we don't have a drop in bed liner. If you have a drop in bed liner, you don't need to put it. But since we do not have one, we're just gonna clean this off. We're using the rubbing alcohol just to make sure it's nice and clean so that that adhesive's gonna stick. So we're gonna take the adhesive off and then attach this right about there, that's where we want it. Try and keep it nice and straight as we rip the cover off and the adhesive attaches to the bed. Now it's probably gonna be longer than the bed so you're gonna have to cut what's left over and we'll do that here when we get to the end. You can come back here, I'll cut it to length, and then push the rest down. Now we're ready to set our side rails here on the side of our bed. Make you push it as much forward as you can. The silver piece goes up towards the front. So we're gonna push that as forward as we can. And then we're gonna add our clamps. So this part might be good to have a second set of hands to help you hold the rail up there while you attach the clamp. I think I can do it with one hand here to at least get the first one started to help me hold it in there. Now while you're doing this, when you go to put the clamp on there, you're gonna wanna put it up underneath the bed right there so it's gripping in and you wanna push it up as high as it can go before you start tighten it. So we're gonna put our clamp on here and make sure the backside goes on the backside of the rail and the front side's gonna go on our new rail that we put on top. Now we're gonna take our clamp and put it into place. Needs to be six to nine inches away from the front here. So we're already measured out the other side. So I'm just matching this one up. You wanna push this, make sure it's loose enough for the clamp to separate. So gonna go on both sides. We're gonna go behind the bed rail and then behind our tonneau cover rail here too. So that looks like in the about right position. I'll go ahead and tighten that down so that rail stay