Published On Jun 15, 2019
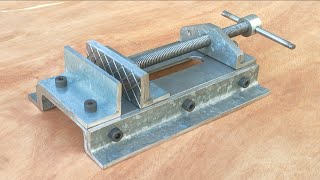
In this video i'm restoring a very old Blacksmith Leg Vise.
My friend has found this blacksmith leg vise at the junkyard. It is huge and and very heavy, over 43kg. I really liked the size of it, the very long handle and the design from the spindle and the spring, that's why I decided to restore it and make a video about it. I think this vise is around 100 years old.
What I first expected to be a simple straight foraward project turned out to be a very tricky one. After cleaning up the two big pieces with the jaws I noticed that they don't close parallel. When the jaws touched eachother on the right side, they had a 2.5mm gap on the left side. To get this restoration done properly I decided to machine them. I made an aluminium plate to clamp the vise on the milling machine. To mill the structure of the rough jaws I bought two carbide milling plates and let them customize by grinding certain angles to them. The milling worked very well and I'm very happy how the jaws turned out. After the milling I did harden and temper them again.
As the holes and countersinks from the heart shaped part were very small and rough, I drilled bigger holes and made the countersinks bigger and clean for 10mm screws. I did recut the threads with a threading file, because I didn't had this threading die size.
I just cleaned up the spindle with files and emery cloth, removed scrateches and sharp edges.
The nut had a groove in it at the end, I closed it with TIG welding and turned the welding spots clean on the lathe. I sanded the rest with emery cloth and cleaned it up with a file.
I decided to mill the rectangluar washer clean, because it was very wavy and had an overall rough shape.
While I was recutting the threads from the two square nuts, I realized that they were slanted. For that reason I decided to make new ones.
I bent the spring symmetrical and grinded the very rough shape clean on the belt grinder.
After cleaning up all the parts I did sandblast them, made them black with bluing liquid and painted them with a dark green hammertone paint. After the reassembly I realized that the vise looks very dark overall with the dark green and all the black parts, so I would definitely choose a brighter colour for next time to achieve a nicer contrast. Besides that I'm very happy how this project turned out. My friend who allowed me to use his milling machine to remake the jaws was very fascinated by this leg vise and he really liked it, I'm going to give it to him after the restoration.
I hope you like my work and the video.
Huge thank you to all of my Patreon and PayPal supporters and specially to:
Mike Rogsch
Scott Meola
john ortega
Joel Zwahlen
Andrei Sitnikov
Mathias Lincke
Afreeflyingsoul
Micky McKay
Alan Hanson
Alex Roussos
Dan Williams
Gregory
Joan Casanovas
John Romero
Jonathan Heckerman
LVE
Paul Mampilly
SA Graver
Vince Valenti
Zachary Grimes
Timestamps:
00:00 preview
00:40 disassembling
01:24 showing all the parts
01:31 cleaning the parts with the parts washer
01:51 removing rust with MC-51
02:26 restoring the fix jaw
03:00 restoring the movable jaw
03:43 testing the jaws
04:02 sandblasting the fix and movable jaw
04:37 soften the hardened jaws
04:50 preparing to mill the jaws
05:19 machining the rough jaws on the milling machine
06:59 harden and temper the jaws
07:20 restoring the heart shaped holding plate
08:01 restoring the spindle with the handle
08:48 restoring the nut
09:55 restoring the holding plate for the spindle
10:16 restoring the rectangular washer
10:47 making two new square nuts
11:41 restoring the spring
12:20 sandblasting
13:02 making the parts black with bluing liquid
13:42 painting the parts with hammertone dark green
14:19 showing the restored blots and nut and custom washers
14:31 showing all the parts before reassembling
14:37 reassembling
15:58 showing the finished product
16:54 final test
Time and costs of this restoration:
I was working on this project over 3,5 weeks
$80 milling tools
$200 customizing the milling tools
My camera:
Panasonic HC-V180
If you have any questions about the process, machines i'm using or other stuff, just ask me in the comments. I read them all and i try to reply as soon as possible.
Sorry for my bad english, it's not my language. I try my best to improve my technical english.
Subscribe for more of my content. I'm uploading videos about mechanical stuff, as new creations and buildings and also restorations.
Thank you for watching :-)
My Patreon Page:
/ mymechanics