Published On Feb 22, 2022
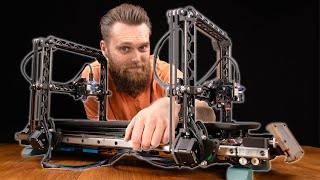
Hi everyone! In this video I’ll show you how I’ve made a carbon fiber print bed for my Ender 3 S1.
Some of the biggest advantages of using a carbon fiber bed plate on your 3D printer are the following:
1. Lower weight of the build plate (more stable movement)
2. Thermal stable on expansion (so less bowing or shrinkage of the plate)
3. Good thermal conductor (carbon fiber will take up heat faster and remove heat faster)
4. It looks good :D
Is this much better than a glass plate? No, you could get the same results with a glass plate but I believe this plate will have benefits using some more exotic filaments like ABS, TPU, Nylon, PET,…
Specially with the low thermal expansion and thermal conductivity of the carbon fiber
Let me know what printers most of u are using, so I can make some iterations on this video in the future based on most used 3D printers in the description.
I mainly work with carbon fiber on this youtube channel but decided to add a bit of 3D printing in my adventures.
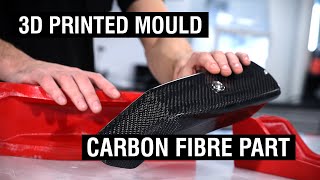
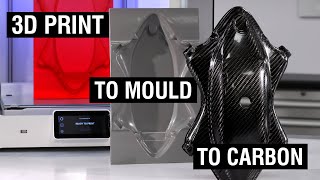
As for the carbon fiber bed:
I’ve used various layers of carbon fiber to make a stable stack of layers with different weight of carbon fibers and carbon fiber orientation. Doing so I’m able to make a stable plate that won’t warp after demoulding or in the future while using it.
I have some more elaborated videos on my channel on my channel if interested in carbon fibre or processes used.
For this plate I’ve used the resin infusion technique (also called VARTM) to produce a nicely compacted stack of layers to add the resin to. The pressure of the vacuum will create an even thickness after demoulding the part.
As for the resin I’ve used some high temp resin from Easy Composites. In the past you might have seen that I’ve used the IN2 infusion epoxy resin. Having higher temperatures involved with 3d Printing I decided to use a higher temperature resin. The High Temperature resin from Easy Composites can be infused as well but has a higher viscosity so it’s advised to only use this on smaller and less complex parts. I let the resin cure for over 12 hours at room temperature before proceeding with the post curing of the part and resin into the oven. The part was graduality ramped up to higher temperatures over a timespan of 12 hours till 120°C. This means we now have a Tg value of 120°C for the print bed. Meaning it won’t bed, warp, melt till these temperatures.
To flatten the part after demoulding (B side has a peelply finish due to the peelply) I’ve used some primer out of spray can to highlight the low and high spots. Than I proceeded with sanding with a 150P grit sanding paper on my Mirka orbital sander. While sanding you’ll see how far you’ve got through the peelply finish and where you need more sanding. Having the B-side finish we can now proceed with the A-side. The A-side already had a good finish so I was able to start sanding with a 1200P grit followed by some polishing.
As For the printing:
I’ve made this printbed for my Creality Ender 3 S1. In case you’ve missed my review on this printer you can find it on following link: • Creality Ender 3 S1 - Good or bad?! R...
I’ve adding the plate using some clamps followed by some bedleveling. Keep in mind that adding a plate like this will lower your build volume due to the space the clamps are taking. I’ve noticed this while levelling the bed and having the CR touch interfering with the clamps. By moving the clamps I was able to solve that problem and proceed to do a first heat test of the bed. I’ve noticed that the temperatures where a bit of but I’ll fix that later on with some PID tuning in the software.
Once everything ready I was able to do a first test print, on the new Carbon Fiber print bed, being a calibration cube. I’ve started a bit higher on the Z-axis to lower it while printing till I was happy with the adhesion on the print bed. The Print turned out great with a good finish on the bottom of the part, even leaving an added bonus of having a nice texture of carbon fiber on the bottom. So far so good and more happy with this than my PC flex plate that came with the Creality Ender 3 S1 printer stock.
I’ve added a new print being a Benchy to make sure everything was running well. And it did! Good benchy came out of the printer without being knocked of the builplate.
Carbon fiber carbon fiber carbon fiber carbon fiber carbon fiber
3d print 3d print 3d print 3d print 3d print 3d print 3d print 3d print 3d print
Bed plate Bed plate Bed plate Bed plate Bed plate Bed plate Bed plate Bed plate
For more of my projects make sure to follow me on:
Facebook: / mat2composites
Instagram: matthieulibeert
twitter: @matthieutje65
web: https://www.mat2composites.com
#creality #carbonfiber #3dprint