Published On Premiered Dec 25, 2021
Get Woodworking Plans: bit.ly/435DMBP
Get what's in this video from Amazon:
Hanging garage storage rack: https://amzn.to/3etd39G
DeWalt 20v cordless drill: https://amzn.to/3EsGFP9
Socket set: https://amzn.to/3HeYC5t
Crescent wrench: https://amzn.to/3EqdjRx
Rubber Mallet: https://amzn.to/3svySxF
Visit Woodwork Family's blog at: www.wooodworkfamily.com
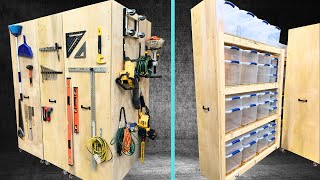
In this video you will learn the exact method to install a hanging storage rack from the garage ceiling.
To install this garage storage system simply start by locating the rafters in your garage. To do this you may need to use a stud finder.
Once you have these located, mount the four angle bars that have the oval shaped holes in it. these will be secured using the supplied lag screws.
It is very important that all the lag screws are securely anchored into your wooden rafters. If not the strength of the storage rack will not be optimal.
Next secure the four vertical brackets at the location of the four corners of your hanging garage storage rack. To do this you will use one hex bolt, one nut, and two washers (one for each side of the bracket.
You may need to secure two brackets together to give you extra length. Make sure you are not too low that it affects the garage door when opening.
Also make sure the pear shaped holes in your vertical brackets have the small side pointing down. This allows the horizontal frame to secure to it.
When installing the horizontal frame, you may need to have an extra set of hands helping you. Ask a friend or family member to get on an adjacent ladder and hold the opposite end near the vertical bracket while you hook your side in.
Once you get your side in place you can have your friend secure their side. No hardware is needed to keep these pieces secured. Gravity holds them in place.
I recommend using a rubber mallet to tap them down, securing them further.
After all four sides are locked in place you will install the center cross piece. this one requires two hex bolts, two nuts, and four washers for each side.
After you have everything installed correctly its now time to make sure all the hardware is locked in place.
If you are using the metal wire grate for the surface of your storage it is now time to put those on. they simply get placed right on top of the storage surface, next to each other.
If you are not using these you will want to use a 4 ft by 8 ft by 3/8 inch thick piece of plywood. I recommend this option if you are storing any smaller items.
I was using the metal grates because this storage system is holding bins. I also like the grates because it lets you see what you are storing up there from the ground, instead of getting on a ladder.
If you liked this video please give it a "thumbs up."
Make sure you SUBSCRIBE to Woodwork Family to get more awesome videos like this one.
Thanks for watching,
Kevin
www.WoodworkFamily.com