Published On Oct 7, 2021
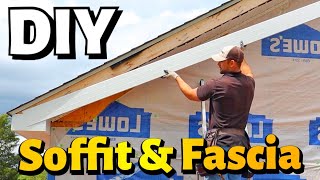
Install soffit boards to cover up the nails that penetrate the sheathing after replacing your roof. See my “Campbell Roofing Replaces our Roof” videos.
TOTAL COST: $7,947 (including belly band boards and corner trim)
This is Part 1 of two videos that document a three-day home exterior improvement/repair project completed by Three Crowns Inc.
About five months before work began, we had signed a contract with Three Crowns Inc. to complete a home exterior improvement/repair project. The work to be performed included installing soffit boards under the eaves of our new roof and repairing/replacing the rotted ends of some of the T1-11 siding on the north and west sides of our garage.
We wanted to install soffit boards to cover up the ugly nails that penetrated the sheathing after our roofing was replaced by Campbell Roofing (see my “Campbell Roofing Replaces our Roof” videos). When we learned that using short roofing nails over the eaves to avoid the unsightly nails would void the roofing tile manufacturer’s 30-year warranty, we decided that installing soffits was the best solution.
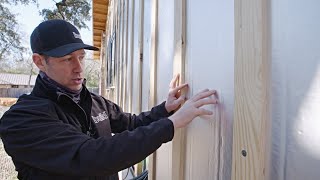
The rotten wood at the bottom of some of the T1-11 siding on our garage was likely caused by the previous owners allowing the siding to be in contact with the dirt, and planting plants or grass next to the siding along the foundation for many years. Besides being unsightly, it was impossible to tell how much internal damage there was to the wood, or if the siding or wood structure in the walls were actively infested with powder post beetles or termites until the rotten sections were removed and inspected. Before ripping off mostly good and difficult to find, and very expensive T1-11 siding, Three Crowns recommended cutting an 8” high strip along the bottom of the siding on the two sides of our garage, and if they found no additional damage, they would install belly band boards to cover up the opening. Fortunately, this turned out to be the perfect solution!
Like I do with all my YouTube videos, I got permission in advance from Three Crowns to record video of their crew while they installed Hardie soffit panels on our old house.
I hope that you find this video both entertaining and informative. Thank you for watching and for visiting my channel!
– Randall
What you will see in this Part 1 video:
1. Cutting and removing strips of siding at the gable ends of the house to allow for the 2x4 nailer board structure to be attached directly to the exterior walls.
2. Installing Hardie Soffit Panels beneath all the eaves
3. Installing trim boards to cover a gap between the soffit panels and the siding.
What you will see in the Part 2 video (coming soon!):
1. Installing the remaining trim boards to cover a gap between the Hardie soffit panels and the siding.
2. Installing corner trim boards on all six corners of our house
3. Cutting an 8” wide strip off the bottom of the T1-11 siding at the north and northwest sides of our garage, some with wood rot.
4. Installing belly band boards with a metal flashing between the new horizontal boards and the old T1-11 siding.
Background:
Two weeks after our roof was replaced by Campbell Roofing (see my Campbell Roofing videos), Three Crowns came out to install new Hardie soffit panels. Three Crowns had coordinated with Campbell Roofing for scheduling this job. After Three Crowns had finished installing the soffit panels, they repaired the rotted bottoms of the T1-11 siding at the north and northwest sides of our garage, cutting a strip about 8” high and installing new spruce belly band boards with a metal flashing in between. When all repairs were finished, Three Crowns installed corner trim boards on all six corners of our house (video coming soon).