Published On Feb 17, 2021
🎁 DOWNLOAD THIS PROJECT FILE & ASSETS FOR FREE! 🎁 https://som.bz/3u4AZXA
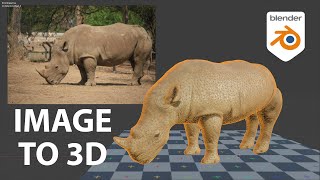
Photogrammetry is a powerful tool for capturing objects in the real world and turning them into gorgeous 3D assets. Now, we’re going to show you how to get started with just your cell phone, laptop, and the shoe off your foot.
In this tutorial, freelance artist Patrick Letourneau is going to show you how to capture images on your phone and convert them into realistic 3D assets.
Patrick’s YouTube Channel | / @patrickletourneau8177
Instant Meshes | https://github.com/wjakob/instant-meshes
~ - ~ - ~ - ~ - ~ - ~ -
🎓INTERACTIVE ONLINE CLASSES 🎓
Cinema 4D Ascent | https://som.bz/c4dascent
All Courses | http://som.bz/2wKsBDu
🧭FREE 10-DAY INTRO COURSE 🧭
The Path to MoGraph | https://som.bz/2VNHb7D
🚴♀️FOLLOW US FOR MORE LEARNZ 🚴🏾♂️
Website | https://som.bz/2VMjr3N
Podcast | https://som.bz/3czNeCP
Facebook | https://som.bz/3cF3SBh
Twitter | https://som.bz/2PQfSWF
Instagram | https://som.bz/2POOJU7
---------------------------------------------------------------------
Auto-Generated Transcript Below 👇
Patrick Letourneau (00:00): Sometimes the best way to create a new 3d asset is to capture it in the real world. But what if you don't have any fancy scanning equipment? Well, as it turns out, you can get great digital capture using just yourself.
Patrick Letourneau (00:20): Hi, I'm Patrick Letourneau 3d artists, photogrammetry, NIST, and secret crime fighter. You've probably heard the term photogrammetry before, but maybe you thought it was a bit too advanced or complicated to try yourself. Well, I'm here to show you the technique for capturing incredible 3d scans of the world around you. Using tools you probably already have at your fingertips. Photogrammetry is the science of making measurements from photographs. Using multiple input images. Software is able to infer super accurate three-dimensional models that you can put to use better yet. You don't need expensive equipment or complicated software to get started. Just your cell phone and some supplies from around the house. In this tutorial, you'll learn how to set up objects for capture and adjust them into software, how to clean up and simplify your model texturing and baking normal maps. How to export the model into cinema 4d and Redshift, and the difference in quality between a cell phone scan and a commercial scanning setup. Before we begin, don't forget to grab the project files in the description below so you can follow along. Let's get started.
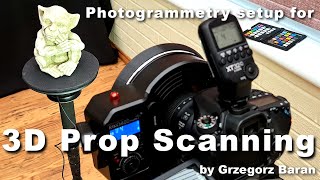
Patrick Letourneau (01:30): So here's my setup. Uh, as you can see, it's just a shoe on a tripod. I've got a toilet paper roll there to elevate the model. This lets me get underneath it to shoot the sole. So you want to be shooting in a camera app that allows you to control exposure and ISO and things like that. Uh, you don't want to just use your straight up camera app because the exposure will usually change between images and you can't set focus separate from exposure and a lot of the default camera apps. Uh, so here I'm using pro app. This lets me get TIFF images. You want uncompressed images of possible, um, as the compression and JPEG will lower your detail a little bit, but, um, that can be a more advanced step. Once you've done your first practice runs, it's probably fine to use JPEG. So a DSLR makes us a lot easier.
Patrick Letourneau (02:15): Obviously don't need to really explain that. You can see, uh, my movements here, I'm attempting to be systematic and kind of create a dome of pictures around this thing. Um, you know, you'll do a ring above the thing, and then you do a ring at the same level as this, uh, as your subject. And then maybe you can go do some orbits of special areas that haven't been covered previously here. You can see them shooting underneath the soul, probably not going to focus on the bottom of the shoe too much for this tutorial, but it's good to have there as additional imagery. Uh, my main advice would be always overshoot, never undershoot. It's a lot easier to delete extra images and to make images you never took in the first place. In addition, you want to shoot on an overcast day and that is critical for outdoor scans. This, if you've got the sun casting shadows across something, those shadows will get baked into your model and then it becomes really difficult to relate it yourself in your CG application. So remember to shoot in the flattest, most neutral overcast light that you can, the next step up from this, of course, it'd be an a studio where you have a lot of light control, but for today's tutorial, we're just going to talk about this sort of entry-level shooting with a cloudy overcast day.
For the full transcript visit: https://som.bz/3u4AZXA