Published On Premiered Oct 27, 2020
Hi everyone my name is Matthieu and in this tutorial I'll show you guys how to finish your puzzles by casting them in epoxy resin to have a nice clear glass like finish on your puzzles so you can hang them on your walls or use them as a stand alone piece of art. In this video I'll be using the @glasscastresin range of products from @easycompositestv I'll take you guys through the steps of sealing the puzzle with Glasscast 10 followed by a deep pour with Glasscast 50 and using Glasscast 3 for the high gloss finish we are aiming for.
First step is to glue the puzzle on a backing. We are using a melamine board as a base. We will use some IN2 epoxy resin to glue the cardboard puzzle on. I've used some 390g/m² fiberglass cut to shape and the saturated with the resin. The film of epoxy resin and fiberglass is now positioned on the plate and serves as a "prepreg" glue film we can position the puzzles on. To bond the puzzle on that epoxy film in a good way we are using vacuum to press the pieces into the wet epoxy film. After 24 hours you can demould your sheet with the puzzle glued on.
Next step will be to prepare the mouldbox. I've used melamine again with some release agent on to ensure a good demoulding later on. Make sure your mould box is leak-free to avoid problems later on.
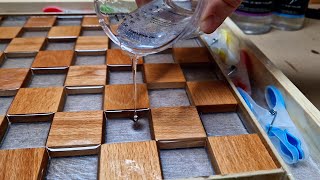
First layer to saturate the cardboard puzzle is the Glasscast 10, Make sure to mix the resin well and read the product instructions on Easy Composites website. Apply a layer of epoxy on your Puzzles now and you'll see the cardboard sucking up some resin and fully saturate the Puzzle. This will avoid having some troubles later on with airbubbles.
Second layer is the Glasscast 50. Make sure to mix the A & B component very well before pouring. Now you can just pour your layer on top of the Glasscast 10 while the resin is still not fully cured (about 8 hours at 20°C)
The Glasscast 50 is self degassing meaning airbubbles will raise over time and pop on the surface. If you still have some airbubbles you can remove them over time. Make sure not to overheat your surface with a torch as it might cause some problems to your finish.
Last layer is the Glasscast 3, Glasscast 3 is used to add a high gloss self leveling surface. Make sure to sand your part first after having the part being fully cured (I've waited 3 days) Before applying make sure your surface is flat and clean and apply the resin. The resin will self level. Make sure to let it cure in a stable environment (temperature and humidity level)
You are done and you can hang your puzzle on the wall!
For all the products used and more information check the Easy Composites Website!
For more of my projects Make sure to follow me on:
Facebook: MAT2COMPOSITES
Instagram: matthieu.libeert
twitter: @matthieutje65
web: https://www.mat2composites.com
#Puzzle #Epoxy #Casting