Published On Jan 16, 2022
Hi everyone!
Focusing a bit more on 3D printing in this new series of video's on my YouTube-Channel!
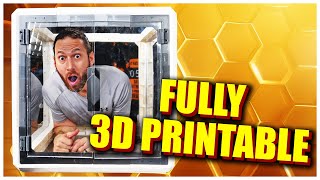
In this video I'll focus a bit more on how I've build a strong, rigid 3D printing enclosure for my 2 Creality Ender 5 Plus 3D printers. This enclosure will help me experiment a bit more with other types of fillament and materials. Mainly materials that need more stable temperatures and settings like Nylon, PET, ABS, TPU. As till now I was only printing with PLA giving me good results. With the winter on it's way here in Belgium I found out I needed to get my temperatures a bit more stable during printing, thus why I decide to make this enclosure using https://www.aluxprofiel.nl/
profiles
The enclosure Is made out of Aluminium T-slot profiles 4040 (4cm x 4cm) giving me a strong enough and rigid case to hold my 2 creality ender 5 plus printers. A door is added so I can access the printers when needed.
While searching online for 3D-printing enclosures I didn't found what I was looking for, so I decided to make one myself. Some people suggested welding a frame would be cheaper but I was a bit reluctant welding things into place, drilling holes in steel, having to paint the frames.
Other said you could buy server cases to put your printers in but I didn't really found a good option in the measurements I was looking for, for a good price.
The good thing about the aluminium T-slot profiles is that they are so flexible in options. You can move the profiles, slide in new ones, add profiles, put specific tools on it like legs, hinges, handles, mount things on it and many more (I would highly recommend you having a look at aluxprofiles website to see the many options). An other advantage as well is that you can easily cut the profiles to size just using a circular saw. It's almost as easy as using lego, knex, mecano.
The general box enclosure measurements you'll need to make for 1x Creality Ender 5 plus would be 800mm x 800mm x 800mm (depends on you cable management and how long you bowden tube is. Make sure to measure all of this before tyring to make something like this.
Is this the cheapest option? Probably not... for this build you'll need to count in a price of around 700 euro's for the materials (profiles, connecting hardware, wood, a bit of paint, plexi, lights ...) So it's almost the price of a 3D printer. The advantage is that you invest in making your printers inside the enclosure better. The stable temperatures, dust free working environment, and noise reduction will make your printers able to reach new limits.
Obviously if you just want to enclose 1 printer, you would be able to do this for a way cheaper price than this enclosure with 2 printers and a material shelve on top.
As a general bill of materials (4x 2100mm 4040 profiles, 16x 745mm 4040 profiles (enclosure) 2x 1690mm 4040 profiles, 2x 745mm 4040mm profiles (door)) then bolts, T-slot Nuts, end caps,
hinges. Measurements might vary on your specific choices and measurements, so make sure to make a good drawing and double check your measurements before making something like this.
A good thing of Aluxprofiel is that they can pre-cut everything to size for you for a good price!
For materials used, check https://www.aluxprofiel.nl (dutch)
https://www.aluxprofile.com (english)
they also have a german, english, polish website
For more of my projects
Make sure to follow me on:
Facebook: / mat2composites
Instagram: matthieu.libeert
twitter: @matthieutje65
web: https://www.mat2composites.com
#3Dprinting #Creality #Ender5plus