Published On Jun 14, 2017
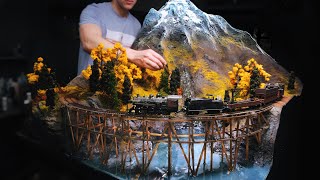
A water scene can dramatically change the look of an already fantastic model and make it look even better! In this easy to follow tutorial I’ll step you through modeling with water from a plain piece of foam board right up to an amazing looking river scene!
This model river is made in HO scale however as with most of the tutorials I do the techniques can be applied to not only HO scale but N scale and lager scales as well. The technique I use can be applied for a slow flowing river or stream modeling a lake, modeling rapids and modeling a waterfall as well.
I use EnviroTex Lite to model this diorama however most two part epoxies will work just as well and you can also use Woodland Scenics Realistic Water which is an acrylic that is easy to use and easy to clean.
A lot of modelers will avoid adding a water scene to their model railroad layout or war gaming terrain because in the past a lot of others have had bad experiences using the various water products however… with some careful planning and proper preparation you should have no problems working with these products.
The technique I use for this diorama can be applied in many different scenarios from modelling a dam to modelling white water rapids and they will all look absolutely amazing. When it comes to adding ripples be sure to only apply a thin layer of Mod Podge, if the mod podge layer is too thick it will become cloudy on humid days as it absorbs the moisture out of the air, the Woodland Scenics Water Effects also has the same problem when applied very thick.
I hope you are enjoying the tutorials, I spend many hours (when I’m not working my day job) filming and editing these tutorials in order to upload them to YouTube. Here are some stats for this video:
Total amount of footage filmed – 12 hours 20 minutes and 14 seconds
Total file size of filmed footage – 104 gig
Total time spent building the diorama – Over 40 hours
Number of photos taken during final photo shoot – 94 (A lot less than usual because it started to rain)
Time spent editing – 22 hours
Approximate cost of diorama - $105.00 (The vehicle was the most expensive at $50 because I had to order it from Europe and pay a large postage fee)
If you’d like to support this channel to help keep the videos coming feel free to check out my Patreon Page where I have a few different perks and rewards for those that support me:
/ luketowan