Published On Feb 9, 2021
Our detailed video and instructions demonstrate a complete brake job performed on a 2012 Ford F-150 XLT, and the replacement procedures will be similar on most Ford F-150 models from 2010, 2011, 2013, 2014, 2015, 2016, 2017, 2018, 2019, and 2020. Signs that your truck needs a complete brake repair include hearing a squealing or grinding noise when braking, or if you notice your wheels or steering shaking while applying the brakes. It’s important to replace failing or worn brake pads in your F-150 to avoid an unsafe braking system and keep yourself and others safe on the road.
Supplies Needed for This Job:
1. Safety Glasses: https://urlzs.com/hbwc
2. Gloves: https://bit.ly/2GvfwAm
3. Brake Pads: http://bit.ly/2ZAW78J
4. Rotors: http://bit.ly/2XNYtzd
5. Jack: http://bit.ly/2ZxQiJl
6. Jack Stands: http://bit.ly/2L1YEp9
7. Ratchet and Sockets: http://bit.ly/2IEAOOi
8. Breaker Bar: http://bit.ly/2UWfies
9. Torque Wrench: http://bit.ly/2UToD1D
10. Wheel Chocks: http://bit.ly/2ZvIW98
11. Caliper Hanger: http://bit.ly/2IZyP6K
12. Bleeder Tool: http://bit.ly/2XQx9Rf
13. Brake Line Wrench: http://bit.ly/2Dyk7jt
14. Brake Cleaner: http://bit.ly/2UxiRmp
15. Silicone Grease: https://bit.ly/3hwhEYY
16. Caliper Compressor: http://bit.ly/2XNZPtN
17. Brake Fluid: http://bit.ly/2VpQfzT
18. Flathead Screwdriver: http://bit.ly/2GTfy5c
0:00 Welcome Back
0:42 Remove the Wheels
1:14 Disconnect the Caliper
1:40 Remove the Old Pads
1:54 Remove the Old Rotor
2:19 Grease Rotor Mount
2:32 Clean Mounting Surfaces
2:58 Install the New Rotor
3:08 Grease the Guide Pins
3:28 Reinstall Brake Hardware
3:55 Install New Brake Pads
4:14 Clean the Caliper
4:33 Compress Caliper Pistons
5:39 Reinstall the Caliper
6:07 Reinstall the Wheels
6:40 Check Brakes and Refill Fluid
6:55 Break-In Procedure
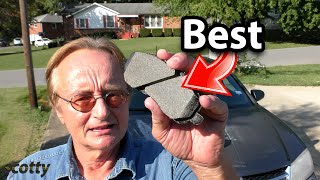
The brake pads and rotors on your 2009 to 2014 Ford F-150 help slow your truck down when you apply the brakes. As the brake pedal is depressed, the brake pads are pushed into the surface of the rotors, which slows the wheels or prevents them from turning to stop your Ford. Grinding or squealing sounds when braking or vibrations felt in the brake pedal are signs that your truck needs a complete brake job, including new brake pads, hardware, and rotors. It’s recommended that you replace your Ford F-150’s brake pads and rotors at the same time, since they have likely been exposed to the same amount of use and wear out at the same interval. Failing brake pads and rotors can affect braking distance and cause poor or unsafe handling in your Ford F-150 that could put you and others in danger. Our helpful, step-by-step video and instructions can help you perform a complete brake job on your 2009 to 2014 Ford F-150.
Facebook: / oreillyautoparts
Instagram: / oreillyautoparts
Twitter: / oreillyauto
Find your local O’Reilly Auto Parts: https://www.oreillyauto.com/locations
Check out Saab Kyle's Favorite Garage Supplies: https://urlzs.com/jg78
Shop all your automotive needs: https://www.oreillyauto.com/
Subscribe and ring the notification bell! http://bit.ly/2bTyluF
On our channel we cover several different topics:
Automotive Product Overviews
Do It Yourself Automotive Repair
DIY Auto Maintenance
Simple Automotive Diagnostics
Automotive and Vehicle Education Videos
O’Reilly Auto Parts is a retailer that provides automotive aftermarket parts, tools, supplies, equipment and accessories in the United States and Mexico for both professionals and do-it-yourself customers. We’ve grown from a single store in 1957 to our current size of well over 5,000 locations (and growing), and our channel offers reliable automotive information that is concise and easy to understand.
#OReillyPowered #FordF150
#BrakePads #CarMaintenance
Park on a level surface.
If your model has a cap over the hubs, remove it… and use a 14mm socket and breaker bar to loosen the lug nuts on the front wheels.
Lift and support the front end of the truck… and chock the rear wheels.
Remove the lug nuts completely from the front wheels… and take off the wheel where you’ll be working first.
Turn the steering wheel to give you better access to the caliper.
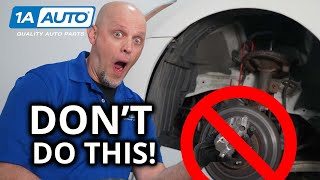
Use a 13mm socket to remove the two caliper mounting bolts.
Pull the caliper off… and hang it with your caliper hanger, making sure to keep pressure off the brake
line. Now you should be able to take the old pads out of the mounting bracket… and remove the four clips.
Use your 21mm socket and a breaker bar to loosen the two caliper bracket mounting bolts… and
remove them. Set your mounting bracket aside for now.
Remove the rotor from the hub. Since you’re replacing the rotor, it’s ok to use a hammer to break it loose if needed.
Never hammer a rotor you plan to continue using.
Use a wire brush to clean any rust off the face of the hub.
Once clean, apply some of your 100% silicone grease to the hub before installing the new rotor.
*View full video for complete instructions*