Published On Nov 16, 2023
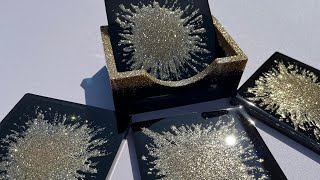
For this project I used @StoneCoatCountertops epoxy to makeover two built-in laminate topped desks. The first step was to prime the laminate with a bonding primer. Next, I followed up with two coats of white paint to establish the base color. For the epoxy colors, I used white, black and gold metallic powders. I started with the white tinted epoxy on the entire surface, then added a little bit of the black and gold epoxies. The only thing I didn’t like was how the gold color looked in the end. I personally would have liked for the color to be a bit darker. After the epoxy hardened, I used Stone Coat’s Gloss Top Coat to provide a durable tough protective layer. This project was very simple and easy, I was able to do both counter tops at the same time and the entire process was done in just 4 days.
Stone Coat Epoxy kit: https://www.stonecoatcountertops.com/...
Get Canva and start creating! (not an affiliate, just love this site!) https://www.canva.com/join/tlq-twc-qzh
Come say hi on Instagram! / thediygrunt
Website coming soon.
CAMERA GEAR USED:
○ Camera – https://www.amazon.com/Sony-Content-C...
○ Mic - https://www.amazon.com/Rode-VideoMicr...
○ SD card – https://www.amazon.com/Sony-Content-C...
○ SD card/USB adapter – https://www.amazon.com/gp/product/B08...
○ External Hard drive – https://www.amazon.com/Seagate-Portab...
○ Handheld tripod – https://www.amazon.com/Newmowa-Portab...
○Tripod – https://www.amazon.com/UBeesize-Bluet...
DISCLAIMER: Links included in this description might be affiliate/referral links. If you purchase a product or service with the links that I provide I may receive small compensation. There is no additional charge to you! Thank you for supporting The DIY Grunt! Be sure to subscribe, like this video, and leave us a comment! Keep an eye out for our next video 😊
#stonecoatcountertop #epoxydesk #diyepoxy