Published On Feb 4, 2017
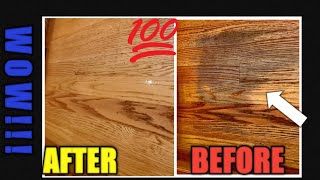
This is a video about how I figured out how to get old cat urine stains out of my wood floors for relatively cheap (less than $40) and in one day.
PLEASE READ INSTRUCTIONS BEFORE STARTING. There is stuff I figured out after I posted video and added into the instructions below. And on my web page...
http://thatchicknyc.blogspot.com/2017...
This what you will need to buy or have on hand, your total cost should be less than $40 and it will take you about a half a day (depending on your floors) to get them clean.
**YOU MUST SAND/STRIP YOUR FLOORS FIRST. This does not work on waxed/stained/sealed wood. No treatment will.* So the cost of sanding/stripping/de-waxing is not factored into my stain removal costs.
TOOLS NEEDED:
1. Cheap spray bottle ($2)
2. 3% hydrogen peroxide (may need 2 or 3 bottles) ($4)
3. toothbrush or scrub brush ($2)
4. used towels
5. rags for cleaning
6. plastic gloves to protect hands ($2)
7. plastic container for mixing developer ($2)
8. large bottle of 40% hair developer ($4) – you might need 2 bottles if you have a lot of stains to remove.
9. several packets of 1 oz. powder developer ($3 each) so about $12+
10. an iron
11. cheap paintbrushes ($2)
12. saran wrap ($3)
And this is what you need to do.
DIRECTIONS:
---- IMPORTANT: after your FIRST sanding, work on getting the smells out first. Use natures miracle or white vinegar and baking soda. It might take more than one application. Clean up with a little soapy water.
I say this because I used white vinegar and baking soda to remove a cat puke stain, AFTER I bleached my floors, and it darkened my newly sanded wood to a light grey color. So, I had to re-sand it again.
1. SAND YOUR FLOORS, OR SAND THE STAINED AREAS. This will NOT work on wood that still has varnish/wax/lacquer on it. The bleach has to have direct contact with the wood.
2. Spray the stains with peroxide or water. Do NOT soak floors. You don’t want puddles of water/peroxide interfering with the bleach. You just want the wood damp enough to accept the bleaching agent easily. You also don't want the wood warping from excess water.
3. Mix your developer in small batches so it doesn’t dry out. ( 1 oz powder lightener to 2 oz 40% crème developer) *wear gloves like all bleach, this stuff will burn your skin if left on too long*
4. Paint the developer on the stains with a paint brush. Be careful to avoid painting on the unstained wood. You don’t want to over bleach your undamaged floors. If you get some extra developer on the unstained wood, wipe up quickly.
4. Cover bleached areas with saran wrap.
5. Soak your towels in warm water then wring most of the water out. You want the towels wet enough to create steam when a hot iron is pressed on them. The towels should NOT be dripping wet. Lay the wet towels on the saran wrap.
6. Set your iron to highest heat setting. Make sure your iron has water in it to create steam/heat. Place the iron on the towels that are over the saran wrap. do not iron saran wrap directly Iron over the toweled areas with the stains. Steam each stained area about 10 to 15 seconds. Repeat a few times. You want to make sure the stains are getting warmed up by the iron. Heat causes developer to work faster and better. The saran wrap is also forcing the developer to penetrate deeper into the wood because it can't evaporate.
7 . Let the hot towels sit on stains for 10 minutes. Come back and steam stained areas again. Let the towels sit for another 10 minutes.
added later after more experimenting I found out*** You CAN speed up the lightening process significantly by not using the saran wrap under the towels during the 2nd steam. However it will lighten a LOT faster... so be careful. You still have to do the first steaming with saran wrap (this makes the developer soak deeper into the wood) by forcing the liquid into the wood. do not skip the original saran wrap steam ****
8. After steaming 2 times, Remove the towels and saran wrap. Now scrub stains with a toothbrush or scrub brush. You will see that the stains have already gotten lighter.
9. IMPORTANT: Clean up the developer THOROUGHLY using clean, wet rags with peroxide or water. Watch the video to see what happened when I didn't clean up the developer properly... :(
10. Let the wood dry for 1 to 3 hours (until it is no longer wet)
11. Check the progress of the stains.
12. Repeat steps 2 - 11 until the stains are lifted to your satisfaction. Remember when you get your desired color, clean the wood THROUROUGHLY with SOAP and water or the developer will continue to lighten the wood.
Also: You can also leave the developer on over night ..BUT it will lighten A LOT more. Like almost white wash your wood. So if you want them super light you can do that. If not, individual applications are best. Thanks for watching and good luck.