Published On Mar 26, 2019
I catch up on an unfinished project. RV Cabinets – Drawers DIY
Videos referenced:
RV DIY Washing Machine Repair - Part 1
• RV DIY Washing Machine Repair - Part 1
Replacing the Dinette Playlist
• Replacing the Dinette in Our Motorhome
This is the good part of having a patient wife, she understands I get busy with many projects and helping people, and so she puts up with unfinished projects. Then when I ask, she reminds me of the ones that still need to be finished.
The bad part is, I can't believe this one has gone for more than a year.
In my defense I have to say that I was engineering a solution to multiple problems on this one, then I forgot about it. Stay around for the end of the video to see how the drawer is multi purpose, by design.
This project is not hard, but does take time because of the finishes to the parts. Paint and epoxy both take time to dry and cure.
The goal to this drawer is to provide storage space for things related to laundry and cleaning in general. So the drawer had to be able to hold a lot of liquids and be water resistant, in case something leaked. Because of this I needed to put extra strength in the bottom of the drawer and use materials that would contain any leaks without being damaged.
I used my router table with a fence to cut the rabbet step on the bottom part. This tool is hazardous and should be used with caution, with that being said it is the best portable tool for making rabbet cuts in wood. Just keep things that you don't want cut away from that cutting blade. The fence makes for a straight cut and you can make multiple passes without cutting too deep. Wear ear protection.
With the box assembled and after letting the glue dry, I started to paint the box. Since I was using the plywood for several projects I cut and painted all of the parts at the same time, I will link the other projects in the description below as they are finished.
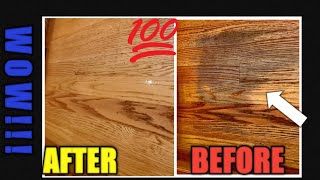
The next day after the latex paint dried I could start applying the epoxy. This is the same material I used for the counter and table that replaced our dinette, and my desk.
The epoxy is great stuff to use for decoration and is very easy to keep clean. However it takes forever to cure unless the temperature is over 75 deg f. I added a little black spray paint to the clear mix to give it some shadows in the finish.
When the epoxy cured I could install the drawer. I started by filling out the recess in the cabinet to attach the slides to with plywood cut to the length of the opening. Then I attached the slides to the wood that filled the recesses using some washers to do the final adjustment.
Now the bonus of this drawer design, if you saw our videos on maintaining this washing machine you saw how much effort it is to get it in and out of the cabinet. So to service some parts it becomes a major project just to get it out of the cabinet, let alone hooking it up to everything to test repairs. This drawer has given us the solution to that problem. When empty and turned upside down, it is the same height as the cabinet bottom, so the washing machine just slides out on to the drawer, the epoxy finish slides very well on the tile floor and so I can now get to the back side of the washer without having to call friends to help, and it's still hooked up to the water and power so I can test repairs I make before putting it back in the cabinet.
This is #HowWeDoIt to make videos and the tools we use:
Cameras:
#Samsung smart phones J7
#yi M1 mirrorless camera with 28mm lens
GoPro Hero 7
Video Editing:
Software:
Open Office
#Filmora
GIMP 2
Hardware:
Dell Inspiron 5570, 16 GB RAM