Published On Jun 2, 2021
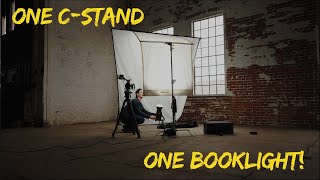
If you’ve never heard of a book light, it’s essentially a light bounced off a surface and then through diffusion to create this big, beautiful soft light. And it’s called this because the setup you use - the reflector and the diffusion - looks like you opened a book. We've gotten this request a bunch and even though I don't use book lights in my work I thought I'd give it a shot. So in this video I'm going to walk you through a quick and simple way to make a book light - and the best part? We're doing it all for under $7.
Book lights are one of the largest, softest sources of light you can create, so the light that hits your talent or subject is going to wrap around them and produce almost no shadows - which is particularly useful for things like portraits or product shots. Utilizing this method produces some of the best light, BUT, because you’re softening and THEN diffusing, you need a buttload of light to start off with. And this is really only worth doing if you’ve got a hard or directional light that’s really bright and you want a really soft light for your project. This isn’t really a great thing to try and do with like a panel light or a light that’s already a bit softer or diffused. It also requires additional stands and clamps and stuff, so you definitely need extra grip gear to start out with.
All the materials you should be able to get locally from your big box home improvement store and a dollar store:
- 4x4 insulation panel (these come in 4x8 panels for ~$13)
- knife
- tape measure / ruler
- pencil or marker
- a thin white material for diffusion (I’m using a white plastic tablecloth from the dollar store but you could use a white sheet or a white shower curtain)
- gaffers tape
- stapler
DIY reflectors: • TUTORIAL: DIY Reflectors
DIY quacker clamps: • TUTORIAL: DIY quacker clamp
Pros:
- insanely inexpensive
- you can easily stack and clamp these two together for storage or transportation
- you don't need any fancy equipment to use them, just some light stands and a few spring clamps
Cons:
- the diffusion panel is SUPER flimsy
- it’s not professional looking
** Video Sections **
00:00 - Intro
00:09 - Background Info
01:38 - Materials List
02:20 - Assembly
04:02 - Using Your Book Light
04:45 - Closing Thoughts
Some alternatives:
5-in-1 reflector - use the outer case of the reflector stretched between two light stands as the reflector, and the sheer in panel as the diffusion. Easy peasy.
Scrim Jim and reflector - using a reflector of any kind you could bounce the light through a scrim jim for a much sturdier, albeit more expensive option. Will look way more professional.
Shameless plug for our DIY scrim jim tutorial: • TUTORIAL: DIY Scrim Jim / Butterfly
Do you have or use book lights? Let us know in the comments section below!
Obligatory social media links:
Facebook: / droimedia
Twitter: / droimedia
Instagram: /
Sign up for our newsletter: https://www.droimedia.com/signup
Don't forget to visit us online at https://www.DroiMedia.com.
Check out all the other gear we use to make these videos: https://www.droimedia.com/kit