Published On Nov 4, 2023
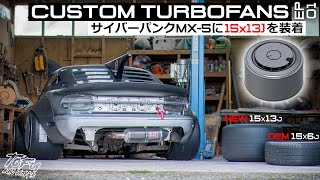
Finishing up the 3D printed turbofans by covering them in carbon fiber, as well as designing the flat covers to go on the top. In this video I experimented with a new pattern that changes appearance depending on the angle of the light hitting it, giving an animated "glitchy" effect when in motion.
Enjoy the video.
Please consider supporting me on Patreon. There's a lot of time and cost in making these videos and I would love to be able to do these full time to make even more content for you. There are heaps of special rewards and behind the scenes posts so please check it out.
/ tofuautoworks
If you are interested in the widebody kit you see on this car, please check out my website where I sell my products worldwide.
https://www.tofuautoworks.com/
Include discount code YOUTUBE15 in your enquiries for 15% off shipping.
If you enjoyed this video also feel free to checkout my Instagram where I post regular updates on all of my builds.
/ tofuautoworks
Links:
Wheels (New Zealand customers only):
https://www.cardwells.co.nz/product/s...
Autodesk Fusion 360:
https://www.autodesk.com/products/fus...
PrusaSlicer:
https://www.prusa3d.com/page/prusasli...
3D Printer:
https://www.elegoo.com/en-jp/products...
Timestamps:
00:00 - Intro
00:10 - Prepping the turbofans for carbon
01:05 - Testing glitch carbon pattern
04:25 - Carbon fiber wet layup attempt
06:22 - Carbon skinning first turbofan
08:26 - Thank you to my supporters
09:22 - Carbon fiber vacuum layup
14:30 - Second turbofan carbon skinning
17:08 - Successful glitch carbon piece
18:25 - Carbon skinning inside the turbofans
22:12 - Trimming completed turbofans
24:22 - Saving the failed carbon attempt
27:29 - Fitting the turbofans
29:52 - Trimming the first turbofan cover
34:40 - Adding 3D printed parts
37:32 - A little sanding
38:35 - Trimming the remaining cover
40:37 - Mounting tabs
43:41 - Prepping for clear coat
45:27 - Spraying satin clear coat
46:32 - Adding decals
47:40 - Weathering and airbrushing
50:10 - Assembling the turbofans
51:57 - Final installation
53:30 - Completed wheels
55:30 - Outro