Published On Premiered May 1, 2022
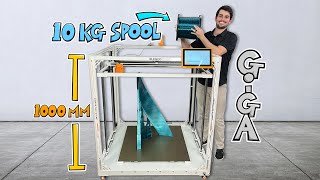
Part 3: It's alive! Watch the first print of the DIY large format 3D printer after finishing the electricals.
Files, Parts, and Info: https://www.drdflo.com/LF3DP.html
OpenBuilds CNC Machines: https://openbuildspartstore.com/?ref=...
Large Format Printer Playlist: • Large Format 3D Printer Build Series
📷 Follow Dr. D-Flo on the Gram: / dr.dflo
Part 3 of the Large Format 3D Printer series covers everything on the electronics side of the project. From building a professional electrical cabinet to configuring the quad gantry leveling, this video covers the circuits required to not only power this massive machine but also create a reliable printing experience.
When dealing with a 4’ x 4’ (1220 mm x 1220 mm) build area, the levelness of the build plate is critical for successful printing. Dr. D-Flo throws the kitchen sink at this bed leveling problem by using manual, mesh, and gantry leveling. After compensation, Dr. D-Flo was able to achieve a levelness within 0.250 mm, which is more than workable when printing with at least a 1 mm layer height.
Because the bed leveling went so smoothly, Dr. D-Flo was able to fire up a test print. While many settings need to be tweaked, you can see the potential of the large format printer. Subscribe to see more prints in Part 4!
Table of Contents:
00:00 – Introduction
00:25 – Z-Axis Limit Switches
01:56 – Print Head Connections
03:36 – Electrical Cabinet
12:47 – Panel Connectors
17:03 – Auto-Squaring (Homing)
18:14 – Bed Heater
19:52 – Leveling Build Plate
23:02 – Glass Bed
24:56 – Probe
28:11 – Part Cooling
31:09 – Printing
34:11 – Machined Components
#Massive #DIY #3DPrinter