Published On Mar 24, 2024
March 2024
In this video, you'll see how I prepare my plant propagation trays for seeding. I've listed my steps below:
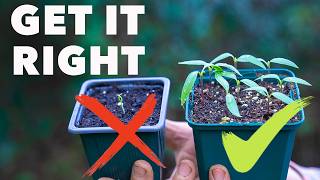
1. Select Trays: Choose trays that are specifically designed for plant propagation. You can find these at your local greenhouse, nursery, or hardware stores (If you don't have any of these nearby, shopping online for "seed starting trays" or "planting trays" is always an option). Ensure your propagation trays are the correct size for your flats by checking for dips in the middle, the two should lay right on top of each other. If you are using recycled materials which don't line up, use plastic pipe to support the propagation tray so the tray is level.
2. Cleaning: Thoroughly clean the trays before each use to prevent the spread of diseases or pests. Wash them with warm, soapy water and rinse well. You can also sterilize them by soaking in a diluted bleach solution (1 part bleach to 9 parts water) for about 10 minutes, then rinse thoroughly. I always leave them to soak for a few hours in clean water after cleaning them with bleach.
3. Fill with Growing Medium: Fill each cell of the tray with a suitable growing medium. You can use an off the shelf seed starting mix, peat moss, perlite, vermiculite, or a make your own.
4. Leveling: Level the growing medium in each cell to ensure uniformity and proper drainage. I do this by pushing down on the medium with my fingers, and adding medium as needed.
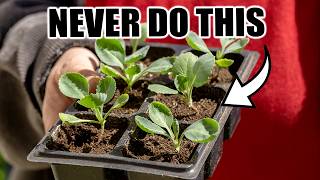
5. Sowing Seeds: Place seeds into the cells one at a time. I prefer seeding by hand, since the tools take too much time to set up.
6. Labeling: Label each tray with the plant variety and date of sowing. This helps you keep track of what you've planted and when. I use plastic plant labels and a sharpie.
7. Watering: Water the trays gently low pressure water, such as an adjustable nozzle with a mist setting, or a watering can with a rose attachment. Avoid overwatering, as this can lead to disease or root rot. Keep the medium consistently moist but not waterlogged.
8. Covering: Some trays come with clear plastic domes or lids that can be used to cover the trays. This helps create a humid environment, which is beneficial for seed germination and rooting of cuttings. If your tray doesn't have a cover, you can use plastic wrap or a clear plastic bag loosely draped over the top.
9. Placement: Place the trays in a warm, brightly lit area, but out of direct sunlight to prevent overheating. A temperature between 65-75°F (18-24°C) is ideal for starting most seeds.
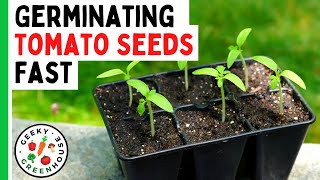
10. Monitoring: Check the trays regularly for moisture levels and signs of germination or rooting. Remove the cover once seeds have germinated. To strengthen your seedlings you can place a fan in front of the trays on low to strengthen your plants' stems.
Check out the rest of the videos in this series to see step-by-step how I start my vegetable garden.