Published On Jul 4, 2021
https://midshipgarage.com/
Quaife ATB diff - https://midshipgarage.com/products/qu...
OEM Viscous - https://midshipgarage.com/products/ge...
Novus Center Console: https://midshipgarage.com/products/mi...
Parts diagrams
Gears: https://www.toyodiy.com/parts/p_J_198...
Shift forks: https://www.toyodiy.com/parts/p_J_198...
Oil feed: https://www.toyodiy.com/parts/p_J_198...
Other: https://www.toyodiy.com/parts/g_J_198...
In today’s video I’ll be showing you how to install a limited slip differential, more specifically a quife ATB differential into a manual gearbox. This will be a detailed step by step video covering the entire process and since we’re opening up the transmission we’ll also be rebuilding the transmission along the way so I’ll be showing you that as well.
I’ll be showing you the LSD install and transmission overhaul on a Toyota E51 transmission but the process is very similar for all other front wheel drive or mid-engined manual transmissions. Obviously to install an LSD into this type of transmission you will need to get the gearbox out of the car. In case of my mr2 the easiest way to get the gearbox out is to get it out together with the engine. This means that the optimal time for doing LSD installs is when you’re doing transmission and/or engine rebuilds as you’ll be killing two birds with one stone like this.
Once the transmission is out the first thing I usually do is to clean it. Transmissions often have years of drit, grease and other contaminants on them and you want them cleaned away before doing any work on the transmission because if you don’t clean them you will get everything else dirty and just spread the dirt around.
Once cleaned it’s time to get the transmission onto a working surface and drain any oil from it. We’re going to start by popping out the axle stubs. Next we remove the clutch fork and start taking the transmission apart. First we remove the three bolts inside the bell-housing.
After that we remove the gear selector levers, and then the gear selector shaft itself
To proceed with the transmission rebuild we must unbolt and remove the transmission top cover. Then we remove the snap ring on top of the input shaft and after that the shift fork together with the fifth gear sleeve. Next we need to remove the hub that sits on top of the fifth gear synchro on the input shaft.
Fortunately the fifth gear on the output shaft has a nice big lip on it so after a bit of heat a regular claw type gear puller gets it off with relative ease.
After we remove the shaft retainer plate it's time to remove the three snap rings that hold the shift fork shafts in place. After that we’ll unbolt the middle casing and lift it off from the rest of the gearbox. Now the output shaft, the differential and the shift forks together with the input shaft can easily come out.
Once everything is clean inside the transmission we start by removing the old output shaft bearing. Here you can see how the old bearing has lost its shine. The non-shiny parts have lost their surface hardness and such a bearing is no longer usable.
We then install the new plastic oil squirter and then the new bearing shell gets gently hammered it.
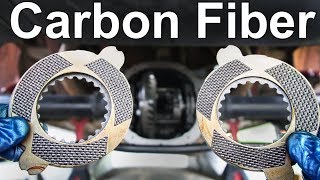
Next it’s time to install the Quaife limited slip differential. Here you can see the Quaife LSD side by side with the stock open differential. We’re going to transfer both of the differential bearings and the ring gear from the stock differential to the Quaife.
First we remove both of the differential bearings, and then we unbolt the ring gear, and finally gently hammer it off the stock differential.
Next the ring bear bolts get thoroughly cleaned in gasoline, the differential bearings get pressed on to the LSD, the ring gear gets gently hammered on, the ring gear bolts get a dab of Loctite and then get bolted down using the weakest setting on the impact wrench. The final step is to torque them down.
Next it’s time to replace the synchro. I’ll only be replacing the fourth gear synchro as it seems that someone replaced the first, second and third gear synchros together with the differential bearings during the last rebuild. Obviously to get to the synchro we need to remove some bearings and gears from the shaft. Once we replace the synchro we install everything in the reverse order of removal.
A special thank you to my patrons:
Daniel
Peter Della Flora
Daniel Morgan
William
Richard Caldwell
Pepe
Brian Durning
Brian Alvarez
D4A merch: https://d4a-store.creator-spring.com/...
Patreon: / d4a
#d4a #lsd #projectunderdog