Published On Premiered Jan 15, 2020
Get your FREE Home Building Planner and over $1000 worth of Free Design concept Boards at https://emmettleohomes.com/home-plann...
This video shares exactly what a grade beam is, and how your home builder or your contractors are going to pour one. Everyone should have a good idea of what is entailed when they are planning to build a garage or a home on a grade beam.
▶ Check out my gear on Kit: https://kit.co/DanielNagy
Emmett Leo Homes is a luxury custom home builder in Winnipeg, Mb. Come with us on a fun journey of building, and renovating custom luxury homes. From multi-million dollar home builds, to massive luxury flips, Emmett Leo Homes is giving you an insiders look into the world of luxury homes, offering tips, tricks, insider looks, and inspiring ideas.
Dan Nagy is the founder of Emmett Leo Homes, entrepreneur, investor, and a retired City Firefighter. After a catastrophic, near career-ending injury, Dan focused his energy into creating the most exclusive luxury building company, using all of his experience in building and renovating profitable luxury spec homes. Learn more about Dan in the link below.
https://emmettleohomes.com/about-us/
Follow Dan and Emmett Leo Homes at:Follow me at:
Pinterest: https://www.pinterest.ca/EmmettLeoHomes/
Houzz: https://www.houzz.com/pro/webuser-872...
Instagram: / emmett.leo.homes
Twitter: / emmettleohomes
Facebook: / emmett.leo.homes
Website: https://EmmettLeoHomes.com
Step 1. Figure out what it’s going to be supported by. A grade beam must be supported by something. Whether the soil condition is strong enough, or if you need something greater underneath, this should be determined by a local engineer and permitted for the area. You might need a geotechnical report, or a soil condition report done in order to test the location that you are building in.
Where we are building currently is in Winnipeg Manitoba. We have a clay base, and we are near a river, so all of the new homes that we build are built on concrete piles, either poured in place, pre-cast or driven timber.
For this home, we have 25’ 16” diameter reinforced concrete piles.
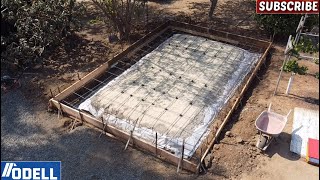
You can see that we have already excavated and prepped the area. Including digging down an extra 12” for the buck drop. The buck drop is there in order to maintain the height and strength of the grade beam where the opening of the garage doors are.
So, we dig the holes for the piles, put in a lot of rebar all the way down and then pour concrete down the holes. This is ensure that we can support the weight that will be sitting on top. In order to attach the grade beam on top, we insert this candycane shaped rebar in the top that will tie the grade beam concrete into the piles below.
As you can see, it’s the beginning of winter, so its pretty cold out. The guys put down insulation on top of them so that they can stay a bit warmer and set properly.
Step 2. Next we frame the grade beam with the forms. As you can see, there is some Styrofoam blocking put down underneath called “void form” so that they can stop the concrete at the bottom and at the proper height, and it allows for some contraction and expansion at the ground level
One of the other places we have to tie it in is into the house. As you can see, we make sure to cut away the existing rigid foam insulation that is put over the concrete foundation. This makes sure that we are tight up against the existing concrete, and allows us to drill in our rebar into the house foundation walls. This is the exact method that the grade beams is attached to concrete piles.
Step 3. Next we pour the concrete. Minimum code requires 20MPA concrete. We like to up the MPA to 30 and use a product called Super Plastisizer, which allows the concrete to flow better, without watering down, and creates a much stronger, better product.
Next the guys make sure that all the air is out of the concrete by either tapping the forms with a hammer or using a gentle concrete vibrator. This is important to make sure that there are no weak airpockets that may have formed inside of your forms while pouring.
The top gets finished off with a shovel and trowel and any excess is dumped off to the side into a pile to make for an easy disposal later.
You can see that the top of the grade beam is indicated by the inset 2 x 4 nailer that remains in the concrete. This allows the guys to nail into it, and fasten their walls directly to the nailer.
We allow the concrete to set, and then remove the forms a minimum of two days later.
Step 4 Remove the forms, and backfill. As you can, the forms have been removed and the backfill was brought in. When we look into the four season room, you can see the void form that sits underneath the grade beams, and the nailer plate that is embedded into the grade beam which makes it easier for the guys to start framing on top.