Published On Premiered Dec 19, 2021
Hi everyone!
Welcome to this new series of videos (4 In total)
All about making an RTM mould to produce composite parts in a fast way.
Through these adventures I'll take you to the final result of making an RTM Fiberglass mould and making parts out of it.
RTM moulding is something I haven't done yet and always wanted to try one day. The big advantages of RTM moulding is that you get a good surface on both sides of the parts. It also makes it possible to produce parts in a faster way, due to the fact that you don't need to apply any vacuum supply and bags. Another advantage is a reduction of waste that is created using the regular technique of VARTM resin infusion.
If you want to watch my first video again (cringe):
• Tutorial - Vacuum Resin Infusion Of A...
If you want to watch the video where commented on my first video:
• My First Resin Infusion (commenting a...
The video series is separated in 4 Parts:
1. Finishing the master with Pattern Coat from @Easy Composites Ltd and getting it mould ready: • RTM Mould - Finish Part With Patternc...
2. Creating the base-mould out of uni-mould tooling resin and solving some issues I had with the mould: • RTM Mould - Making the first mould (P...
3. Creating The fiberglass RTM topmould by first making a carbonfiber part out of the basemould: • RTM Mould - Creating Negative Fibergl...
4. Creating parts with the RTM mould: • RTM Mould - Creating Carbon Fiber Par...
In this video:
Back in the days (more than 7 years ago I started working with composites) At school we had a sample mould and so decided to use it to make my first steps into composites and resin infusion VARTM. Back then I was way less experienced and watching that video over again, I saw a lot of room for improvement. This is why I decided to redo this video but taking everything next level to challenge myself a bit.
In the first video I'll take you through the steps of using one of the parts (fiberglass and polyester resin) I've made back then and get everyting ready for making a new mould. First step is removing any paint that I've put back then on the part (It was a 1K rattle spraycan paint) that might cause any problems with the gelcoat. Sanding the part also made sure that any residue like dust, oil, silicones, glue was removed from the part so we could start fresh.
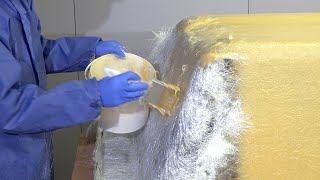
First I add 2 layers of pattern coat from easy composites by brush. The pattern coat (polyester mixture) is mixed with 2% of MEKP hardener (might be more or less, depending on ambient temperatures in the workshop)
Brush strokes and drips aren't a big problem here. The pattern coat is easy sandable and the main purpose of these first layers is to seal the surface and smoothen it as well by filling any possible scratches, pinholes in the polyester fiberglass master.
After letting these two first layers cure it is time to sand the part. You don't need to sand it to a high finish as you still want to have some mechanical bond for the layers that will follow. I've used a 150P grit and 240Pgrit.
After cleaning the part it is placed on a baseboard that will give us the flanges of the mould in a later process while making the mould.
To attach the part on the melamine board I've used some polyester putty bondo and smoothened out the edge with a ball tool to create a nice transition. The bondo is then quickly sanded to remove the skin on top of it.
The 3th layer of Pattern coat is then sprayed on to create a nice even coat. To spray the Patterncoat I've just added a bit of blue pigment to the grey. Some acetone is used to make the pattern coat a bit more easy to spray.
by having the blue added the patterncoat will be a bit of a differnt color, making it easier to see if you are sanding to deep in that last coat.
The pattern is now sanded up to 800P Grit and polished to a high gloss.
Be aware that the pattern coat is not designed for mirror high gloss finish. If you are looking that you can add a last layer of gloss coat, the same way the 3the coat was applied, making it possible to polish the part then up to a higher gloss.
Once all of the above is done the mould can be prepared by adding sides and having the corner smoothened out with filleting wax and the ball tool.
For all products used, check https://www.easycomposites.co.uk
they now also have a .eu website for european customers!
For more of my projects
Make sure to follow me on:
Facebook: / mat2composites
Instagram: matthieu.libeert
twitter: @matthieutje65
web: https://www.mat2composites.com
#Mould #Easycomposites #Carbonfiber